[PABLO] Molotov System in Phaser
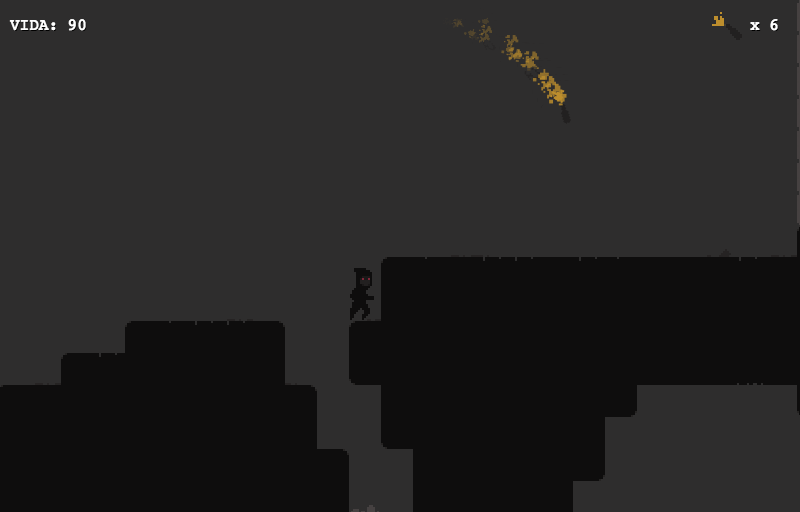
In this post I’m going to explain how the molotov system was implemented in Pablo. Click here to try it for yourself if you haven’t yet. The controls work like this: click and hold to prepare the molotov, then release to throw it. Other controls are the usual ones for platformers - WASD/Arrows for player movement and space to lift/place boxes. There are some State Robots so you can try your aim in molotov throwing ;)
1. The prototype
The idea of a game based on molotov throwing came after reading about the anarchist struggle in Greece within all the political turbulence that the country is passing through. In this conjecture, Alexis Tsipras (Greece Prime Minister), supposedly belonging to a left party, accepted a bailout deal accompained by austerity packages after a national referendum a week before said NO to the decision taken by Tsipras. [1] People is often - if not always - betrayed by their governments, therefore only one way out is left for us: Struggle and organization by ourselves.
Anyways, besides being a great tool in class struggle, I thought that molotovs would look very cool inside a game! So I opened photoshop and began sketching fires, a character, a molotov, grounds, &c., until I had some nice sprites to work with. I wanted to create a gloomy ambient, kinda dark, that reminds me of how protests feel at night. As always, I’ve left to draw a background in another occasion, as it takes so long time for me, specially when working with pixel art.
So before actually diving into the code I had the following prototype in my head:
- The direction of a launch should depend on the angle between the player and the mouse position.
- There should be a trail of fire particles following the bottle.
- It leaves a fire trail after hitting the ground.
- The width of the fire trail depends on the angle it hits the ground.
- The height of the flames depends on the distance from the hit point.
2. Detailed implementation
Before anything, let me say that Game Mechanics Explorer and Phaser Examples helped me a lot respectively in physics and in particles understanding within Phaser engine. Also, if you’re just starting with Phaser I’d suggest you to take a close look into the examples from the website, they’re a better way to learn the engine than many tutorials out there.
You can get the full code for this game prototype in GitHub.
2.1 Molotov group creation
this.molotovPool = this.game.add.group();
for(var i = 0; i < this.NUMBER_OF_MOLOTOVS; ++i) {
	var molotov = this.game.add.sprite(0, 0, 'spritesheet', 20);
	this.molotovPool.add(molotov);
	molotov.animations.add('flames', [20, 21, 22], 5, true);
	molotov.anchor.setTo(0.5, 0.5);
	this.game.physics.enable(molotov, Phaser.Physics.ARCADE);
	molotov.body.gravity.y = this.GRAVITY;
	molotov.kill();
}
I first created a phaser group called molotovPool and then added some elements to it. The number of elements is controlled by this.NUMBER_OF_MOLOTOVS variable set in the beginning of the code. Each element inside the group is an Arcade Physics [2] body, so we enable it with this.game.physics.enable(molotov, Phaser.Physics.ARCADE) and add physics in the Y axis.
2.2 Launch and particles
throwMolotov: function() {
	// Check if it's possible to throw molotovs at the moment
	if(this.lastMolotovShotAt == undefined) this.lastMolotovShotAt = 0; // First during the game click if undefined
	if(this.game.time.now - this.lastMolotovShotAt < this.THROW_DELAY) return; // If player tries to throw a molotov before the time delay
	this.lastMolotovShotAt = this.game.time.now;
	if(!this.firstGameClick) {
		this.firstGameClick = true;
		return;
	}
	this.player.preparedMolo = false;
	this.player.animations.play('molo-throw');

	// Gets a 'dead' molotov element to reuse in the group `molotovPool`
	var molotov = this.molotovPool.getFirstDead();

	if(molotov == null || molotov == undefined) return;
	molotov.revive();
	molotov.checkWorldBounds = true;
	molotov.outOfBoundsKill = true;

	molotov.reset(this.player.x, this.player.y - 30); // Sets the position of the molotov as the current player position
	molotov.iniRot = this.pointerRot;
	molotov.body.velocity.x = Math.cos(molotov.iniRot) * this.MOLOTOV_SPEED;
	molotov.body.velocity.y = Math.sin(molotov.iniRot) * this.MOLOTOV_SPEED;
	this.NUMBER_OF_MOLOTOVS--;

	// Create a particle emitter for the molotov
	molotov.fire_emitter = this.add.emitter(molotov.x, molotov.y, 70);
	molotov.fire_emitter.makeParticles('spritesheet', [23, 24, 25, 26]);
	molotov.fire_emitter.lifespan = 500;
	molotov.fire_emitter.setAlpha(0.9, 0.0, 700);
	molotov.fire_emitter.setScale(1.0, 0.2, 1.0, 0.2, 1000);
	molotov.fire_emitter.setRotation(0, 100);
	molotov.fire_emitter.maxParticleSpeed = new Phaser.Point(-80,40);
	molotov.fire_emitter.minParticleSpeed = new Phaser.Point(-190,-40);

	molotov.animations.play('flames');
}
This part was largely based on the Game Mechanic Explorer bullet system, make sure to check it out for a more detailed explanation!
We first do some checks to make sure it’s possible to throw a molotov and then set its position and velocity. Remember, this is only the launch part, we’ll be updating each molotov afterwards. After that we create a fire emitter as a molotov object and then set specific values to it.
makeParticles(spritesheet_name, [frames]): Creates the particles from a previously loaded spritesheet and allows you to select which frames (sprites) can be used as particles for this emitter.lifespan(time_in_ms): Sets the lifetime in milliseconds of each particle after it’s emitted.setAlpha(maxAlpha, minAlpha, rate_of_variation): Sets the max and min alpha (opacity) values that the particle can get and the rate of variation.setScale(maxWidth, minWidth, maxHeight, minHeight, rate_of_variation): Sets max and min width and height that the particle can get and the rate of variation.setRotation(minRotation, maxRotation): Sets max and min rotation.
I think other methods shouldn’t be hard to understand. In any case, you can always visit the Phaser’s Documentation to be sure.
After launching the molotov we update it each frame:
this.molotovPool.forEachAlive(function(molotov) {
	if(Math.cos(molotov.iniRot) >= 0) molotov.rotation = Math.atan2(molotov.body.velocity.y, molotov.body.velocity.x);
	else molotov.rotation = Math.atan2(molotov.body.velocity.y, molotov.body.velocity.x);
	// Update the position of the fire emitter on each step and emit a particle
	molotov.fire_emitter.x = molotov.x;
	molotov.fire_emitter.y = molotov.y;
	molotov.fire_emitter.emitParticle();
}, this);
The method forEachAlive() takes every molotov alive in the group molotovPool (remember that we revived a molotov when throwing it?) and applies a function, which first do some basic physics to calculate the molotov’s angle and then we update the particle emitter position.
2.3 Hitting the ground
this.fires = this.game.add.group(); // Group for particle emitter
this.fireSprites = this.game.add.group(); // Parallel group for sprites
for(var i = 0; i < 55; ++i) {
	var fire = this.add.emitter(0, 0, 50);
	this.fires.add(fire);
	fire.makeParticles('spritesheet', [23, 24, 25, 26]);
	fire.lifespan = 500;
	fire.setRotation(0, 100);
	fire.setScale(0.7, 0.95, 0.7, 0.95, 500);
	fire.maxParticleSpeed = new Phaser.Point(100, 0);

	fire.spr = this.game.add.sprite(0, 0, 'spritesheet', 0);
	this.fireSprites.add(fire.spr);
	this.game.physics.enable(fire.spr, Phaser.Physics.ARCADE); // Enable physics for each sprite
	fire.spr.alpha = 0.0;
	fire.spr.kill()

	fire.kill();
}
That’s a tricky part. When a molotov hits the ground, it creates a fire trail. Now in the implementation, each fire is a particle emitter. And we also want this fire to hurt the enemy, however, in Phaser you can’t check overlap between emitters and sprites (or at least I didn’t find a way), only between sprites. That’s why I had to create a parallel sprite group containing an invisible sprite for each fire.
this.physics.arcade.collide(this.molotovPool, this.lCollision, function(molotov) { // Checks collision between molotovs and the collision layer
	var tile_hitX = this.lCollision.getTileX(molotov.x); // The x coordinate of the tile hit
	var tile_hitY = this.lCollision.getTileY(molotov.y); // The y coordinate of the tile hit
	var hit_sin = Math.sin(molotov.rotation); // Sin of the angle which the molotov hit the ground
	var hit_cos = Math.cos(molotov.rotation); // Cos of the angle which the molotov hit the ground
	var tiles_in_fire = Math.ceil((Math.abs(hit_cos)*52 - 27)/3.5); // Here we calculate how many tiles will get in fire


	// Play glass breaking sound - the nearer, the louder.
	var current_tile = Math.abs(this.player.x)/this.TILE_WIDTH;
	this.glass_break.volume = 1/(Math.abs(Math.abs(tile_hitX) - current_tile) + 1) + 0.1;
	this.glass_break.play();

	// If the direction of the hit was left->right
	if(hit_cos >= 0) {
		for(var i = tile_hitX; i <= tile_hitX + tiles_in_fire && i < this.world.width/this.TILE_WIDTH; i++) {
			var tile = this.map.getTile(i, tile_hitY, 'collision', true);
			if(tile.index != -1) break; // If it's not an empty tile, break.
			if(tile_hitY + 1 > this.world.height/this.TILE_HEIGHT) break;

			tile = this.map.getTile(i, tile_hitY + 1, 'collision', true);
			while(tile.index == -1) {
				tile_hitY++;
				tile = this.map.getTile(i, tile_hitY + 1, 'collision', true);
			}
			this.getFire(i*this.TILE_WIDTH, tile_hitY*this.TILE_HEIGHT, hit_sin, false);
			hit_sin *= 1.45;
		}
	}
	// If the direction of the hit was right->left
	else {
		for(var i = tile_hitX; i >= tile_hitX - tiles_in_fire && i > 0; i--) {
			var tile = this.map.getTile(i, tile_hitY, 'collision', true);
			if(tile.index != -1) break; // If it's not an empty tile, break.
			if(tile_hitY + 1 > this.world.height/this.TILE_HEIGHT) break;

			tile = this.map.getTile(i, tile_hitY + 1, 'collision', true);
			while(tile.index == -1) {
				tile_hitY++;
				tile = this.map.getTile(i, tile_hitY + 1, 'collision', true);
			}

			this.getFire(i*this.TILE_WIDTH, tile_hitY*this.TILE_HEIGHT, hit_sin, false);
			hit_sin *= 1.45;
		}
	}

	// Kill the molotov that reached the ground and turn its emitter off.
	molotov.fire_emitter.on = false;
	molotov.kill();

}, null, this);
collide is the actual method that checks collision between a launched molotov and the ground, which in the code is this.lCollision - the collision layer in the main tilemap. If a molotov collides with the ground we first get some values which we’ll soon use based on the molotov’s angle: tile_hitX, tile_hitY, hit_sin, hit_cos, and tiles_in_fire.
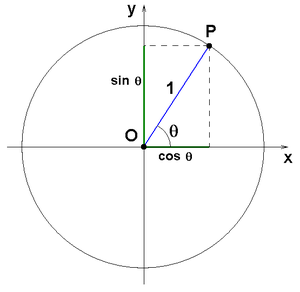
tiles_in_fire is the number of tiles that will be on fire after the hit. We calculate it based on the cosine of the molotov hit’s angle with the ground. First, we must remember that the sine and cosine functions can get values between 0 and 1. With this in mind, if the molotov trajectory is very “open” its angle with the ground gets near to 0, and cosine of 0 is equal to 1, its maximum value. By the other hand, if the trajectory is “closed”, the hit angle will be nearer to 90, perpendicular to the ground. And cosine of 90 is equal to zero, it’s minimum value. As we want a large fire trail when the trajectory is “open” and a small one when it’s “closed”, the cosine function helps us to figure out the width of this trail.


After that we use the current player’s position to calculate the volume of the glass crash sound. Obviously, if the hit happened in a tile close to the player the sound will be louder than if the hit happened in a distant location.
Finally, we use tiles_in_fire to actually add the fire emitters and sprites we’ve created earlier. We do a check to see if the tile is empty in the collision layer (this.lCollision) and it’s possible to place a fire there. Otherwise, we stop adding fires.
I really hope you could understand the basic concepts behind the molotov system. To get a full grasp of how it works, I suggest you to download the project in GitHub and try to see how everything happens “live”.
3. What’s left to do?
Well, Pablo is far from perfect, even for a prototype. And I’m not even sure if I will continue to work with this mechanic, as I’m working on another game project (which hasn’t been made public yet!). However, this system can still be improved to feel better. For example, an explosion just at the moment the molotov hit the ground would make the system look more realistic. Also, I think it’s imprescindible that you can control the intensity of the launch before releasing the mouse button. Whether you control it by the time holding the mouse button or by clicking and dragging (as in angry birds), right now it feels kinda artificial, as there only one launch intensity possible. These and other details can be implemented before begin working on a real game with this mechanic.
Notes:
- http://www.abc.net.au/news/2015-07-13/eurozone-leaders-say-agreement-reached-at-greece-talks/6616448
- Phaser has 3 physic engines available at the moment of this post: Arcade, P2, and Box2D. Arcade uses AABB system to handle collision, which makes it more suitable for old-style platformer games.